

In the previous post, we talked about how to leverage HTML and CSS inside a Text Area. This allows us many possibilities to layout and style our Text Area. In addition to HTML, we can also add JavaScript. There are a variety of capabilities that now become possible. Let’s take a look at some examples.
In this first basic example, we will see how you can use JavaScript to add a tooltip inside the Text Area.
As a general rule, all of the JavaScript we add needs to be unobtrusive (http://en.wikipedia.org/wiki/Unobtrusive_JavaScript) or we will receive an error message.

Also, we can add styles to our Text Area, but we cannot use the STYLE element, so we need to either add them as a STYLE attribute to the HTML elements or by using JavaScript.
Below is an example of the STYLE attribute added to our tooltip DIV tag.

Now, to enter the JavaScript code that will implement the tooltip, click on the JavaScript icon on the top bar of the Edit HTML dialog
![]()
Then you can enter in your JavaScript. In this example, we added 2 DIV tags into our Text Area: one with the id of ‘name’ and another with the id of ‘tooltip’. We pass in those id values as string parameters, and then we can access them in the JavaScript using document.getElementById() method.
From there, we can attach the onmouseover and onmouseout events to main DIV tag and add the JavaScript functions that will be executed to hide and show the other DIV tag.

The full JavaScript code is shown below:
var name = document.getElementById(nameElmt);
var tp = document.getElementById(tpElmt);
var show = function()
{
tp.style.display=”block”;
};
var hide = function()
{
tp.style.display=”none”;
};
name.onmouseover = show;
name.onmouseout = hide;
Another use of JavaScript would be to make some of the content interactive.
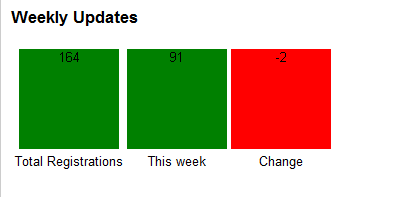
Let’s assume we want to display some Calculated Values in a Table in a Text Area and we want to update the color of the table cell based off the value. We can start by building an HTML table:
<TABLE>
<TBODY>
<TR>
<TD style=”TEXT-ALIGN: center”>
<DIV style=”BACKGROUND-COLOR:green;WIDTH: 100px; HEIGHT: 100px; VERTICAL-ALIGN: middle; align: center” id=tile1></DIV>
</TD>
<TD style=”TEXT-ALIGN: center”>
<DIV style=” BACKGROUND-COLOR:green;WIDTH: 100px; HEIGHT: 100px; VERTICAL-ALIGN: middle; align: center” id=tile2></DIV>
</TD>
<TD style=”TEXT-ALIGN: center”>
<DIV style=” BACKGROUND-COLOR:green;WIDTH: 100px; HEIGHT: 100px; VERTICAL-ALIGN: middle; align: center” id=tile3></DIV>
</TD>
</TR>
<TR>
<TD style=”TEXT-ALIGN: center”>Total Registrations</TD>
<TD style=”TEXT-ALIGN: center”>This week</TD>
<TD style=”TEXT-ALIGN: center”>Chang</TD>
</TR>
</TBODY>
</TABLE>
Then we can add a ‘Calculated Value’ within the DIV tag of the first cell.


In this example we are adding three Calculated Values. One will just display a Row Count. The other will display the total records from this week, using this expression:
Count(if(Week([Date])=Week(DateTimeNow()),1,null))
And the third will display the change in total records from the prior week to this week.
Count(if(Week([Date])=Week(DateTimeNow()),1,null)) – Count(if(Week([Date])=(Week(DateTimeNow()) – 1),1,null))
Next we add our JavaScript. We want our JavaScript to color the 3 DIV tags the appropriate color based on the Calculated Values.
First, we need to access the div tags. In our HTML, we created each DIV tag with a unique ID: tile1, tile2, and tile3. We can access each DIV tag individually using the document.getElementById method from JavaScript as shown below:
val = document.getElementById(’tile1′);
Once we have the DIV object, we can find the value from the Calculated value using the innerText property.
val.innerText
Using this, we can add some logic to check the value and color the tiles accordingly. For example, in the DIV tag where we are displaying the change from last week to this week, we can check if the value is greater than 1 and color it green, and if its 0 we can color it yellow, and if its less than 0 we can color it red.
val = document.getElementById(’tile3′);
intTileValue = parseInt(val.innerText, 10)
if(intTileValue > 1) {
val.style.backgroundColor=”green”;
} else {
if (intTileValue == 0)
{
val.style.backgroundColor=”yellow”;
}
else{
val.style.backgroundColor=”red”;
}
Finally we can wrap all this code in a JavaScript function and then add a timer using the setInterval function to call that function every 5 seconds. This will mean the colors will update dynamically (every 5 seconds) based off filtering.
var myVar = setInterval(function(){colorTiles()},1000);
The complete JavaScript code is shown below:
function colorTiles(){
#Access and Style Tile1
val1 = document.getElementById(’tile1′);
val1.style.width = 100;
val1.style.height = 100;
val1.style.verticalAlign=”middle”;
#Get Value for Tile 1
intTile1Value = parseInt(val1.innerText, 10)
if(intTile1Value > 90) {
val1.style.backgroundColor=”green”;
} else {
val1.style.backgroundColor=”red”;
}
#Access and Style Tile2
val2 = document.getElementById(’tile2′);
val2.style.width = 100;
val2.style.height = 100;
val2.style.verticalAlign=”middle”;
#Get Value for Tile 2
intTile2Value = parseInt(val2.innerText, 10)
if(intTile2Value> 40) {
val2.style.backgroundColor=”green”;
} else {
val2.style.backgroundColor=”red”;
}
#Access and Style Tile3
val3 = document.getElementById(’tile3′);
val3.style.width = 100;
val3.style.height = 100;
val3.style.verticalAlign=”middle”;
#Get Value for Tile 3
intTile3Value = parseInt(val3.innerText, 10)
if(intTile3Value > 1) {
val3.style.backgroundColor=”green”;
} else {
if (intTile3Value == 0)
{
val3.style.backgroundColor=”yellow”;
}
else{
val3.style.backgroundColor=”red”;
}
var myVar = setInterval(function(){colorTiles()},1000);
To learn more about using JavaScript inside a Text Area and to see an example of how to use it to generate an accordion style menu, please view our Quick Reference Topic discussing JavaScript.


